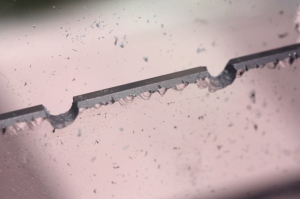
 I used my Dremmel and cut out several places along the top edge of the overflow. As you can see in the second photo, there are 3 over the 4″ wide cell and one at the divider that does not have a support. I found with another water test that I needed to make them a bit deeper and wider to get the surface tension to let it flow. In the future I will cut these notches out before I glue the piece into place and probably make marks to keep them even in their depth. I bought a variable speed Dremmel and am using the slower speeds to work on the plexi. Faster speeds will melt and burn the plexi. It is best to use a scrap piece [I did!!] to practice with and determine the best attachment and speed to get the desired result.

The supports were made from scrap from cutting the pieces for the condo. Unused was a piece 4′ long and maybe 1 1/2″ wide. I cut this piece into 6″ lengths and cut enough to have one every other divider. I then used my Dremmel to cut each one of them in half and removed any rough spots. The two halves were glued together, glue was rubbed on both sides and they were inserted in place and held together till they stuck. You can see one to the left on the picture. On the next water test these worked great.. the overflow was supported and did not bow. This is how I did it.. now here’s what I will do the next time.
After the back wall has dried, remove the plastic film and apply these supports where every other partition meets the back wall and glue them into place. Because I lined them up with a wall they are not really noticable. Make sure there are no spaces between the halves or water will flow through them. Get a good seal with the glue and keep glueing till you get it sealed. Also make sure the supports have good seals to the back wall before adding the overflow. Things are gonna get tight and it becomes a real pain to get glue down into this channel. This is a lot easier than they way I did it. These added supports also reduce the flow of water from the channel into the next cell. There is a little gap that will allow the cells to stay even [ if one should fill more than the others they will equalize] and I am good with that. Most of the water will go up and over the overflow which is what I am wanting.
To add the overflow, remove the plastic film from both sides of the overflow and set it into place. The condo should be on its bottom/base. Make sure you have a good fit. If every thing looks good remove the overflow and apply glue to the supports. Carefully put the overflow in place over the supports taking care not to smear the glue. The overflow will sit on the bottom of the condo so make sure it has good contact alsong the bottom and once it is in place run a good bead of glue down its entire length. Once it sets up don’t forget to glue where it attaches to the sides as well. After it dries run another bead of glue along the base and sides for good measure.
Now we have everything done on the inside and it is time to finish with the back of the condo. Pull up the film from the bottom edge and put the back piece of plexi back in place and use masking tape to secure it like we did in the beginning. Once in place tack it in several places along the bottom and sides to get it to hold well enough for you to remove the tape and get a good bead of glue along the entire outside. Then run a good bead of glue along the joint from the inside. After it sets up hit both sides again with a good application of glue. We are not gobbing it on.. just applying it so it gets into all the little nooks and crannies to make a water tight seal.

Another thing I did was add support along the back seam. I took 2 long thin scrap pieces of plexi and glued them on the back along the seam to reinforce that area. I found moving the condo around put stress on this seam and I did not want it to fail with water running through it. A little added peace of mind.
Allow everything to sit over night then fill the condo with water watching for leaks along the way. A dry erase marker can be used to mark on the plexi so any leaks can be repaired and the marks removed. Allow it to sit a while and see if any slow leaks show up. I run my finger along the outside seams looking for any hint of moisture. If there are any leaks drain and dry the condo then seal the leaks untill it is done.
I then like to let them sit for several days to really cure before I set them up for use. Since I will be building 3 more of these in the next week or so they will have plenty of time to cure before being used. I will set them up and run water through the entire system for a week before I add any fish. And I will probably be adding fish to the system gradually so the biological filtration can multiply and keep up. As of right now I am not completely sure what media I will be using for the filtration.. watch for updates when I get to that step.
July 19, 2010
Posted by DayByDayAlone |
Betta Housing, Fish Room | Betta, Betta Barracks, Betta Housing, Fish Room |
2 Comments
By now the condo is taking shape. You have the front and both sides as well as the walls or partitions in place. The next piece to add is the back wall of the partitions.
 I used 1/8″ thick plexi to build the condo. I wanted a space of 1/4″ under the back wall partition so I have stacked 2 pieces of plexi on top of each other to use as a spacer. I put these spacers every other cell to make it uniform across the back of the condo. Then I took the back wall piece, removed the plastic film that is not marked, and set it into place with the marked side to the back . You can see the walls lining up with the lines we made on the back piece. Again you want to tack enough places to hold the piece without having the glue run down the plexi. When it is secure enough you can flip the condo so this back piece is on the bottom and get a much better seal along both sides of the inside walls. Because of the lip created because the back of the condo is missing, I set the base off the edge of the outside bench I was working on. That allowed stability without creating any stress on the plexi.
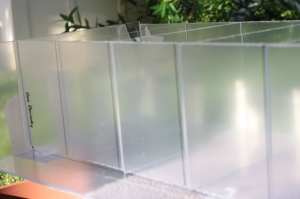 After running glue along both sides of the inside walls and where it attaches to the sides, allow it to sit a while and set up. The overflow piece is next and I will tell how I did it, the problems, how they were fixed and what we will do the next time.
I want a 1/4″ space between the back wall and the over flow. So, I flipped the condo so the back was up and put spacers in place. It was difficult to keep it evenly spaced side to side as well as top to bottom.. but we managed. This piece will be glued to the bottom of the condo.. so I tacked it into place, removed the spacers and flipped the condo so I could get a good seal along the bottom. Once done I proceeded to add the back and after allowing time to set up overnight, did my first test fill with water. We had a few small leaks but the big issue was this overflow bowed out from the water. I also did not like adding water to the first cell and having it run out the back and in this channel into the next cells. So I decided to add some supports. We also had issues with surface tension and water kinda beading up along the top of the over flow so I added in some cutouts to the overflow to get the water flowing. More about this in adding the overflow.
July 19, 2010
Posted by DayByDayAlone |
Betta Housing, Fish Room | Betta, Betta Barracks, Betta Housing, Fish Room |
2 Comments
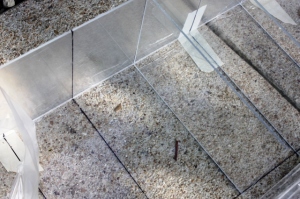 Before we actually get to adding the walls, we need to make the frame a bit more solid. Carefully pick up the frame and flip it over. Run the glue along the entire front seam and both sides taking care not to glue to the back of the condo. Tilt the condo on its front so you can run a good bead of glue along both front corners. Allow it to sit 30 minutes or so then carefully remove the tape securing the back and remove it. Remember one side of the plastic has been removed so take care when sitting it aside.
Now take the 11 pieces that are to be your wall and hold the bunch together and sit them on the shorter side. Since that kinda didn’t make sense.. what you are doing is seeing which pieces are a bit longer than the others. Because you really can’t have pieces cut precisely without paying a lot for it.. you have to work with the irregularities that come up. Some of these pieces are going to be a bit longer or shorter and bunching them together on end will let you see that. Then put then in order from tallest to shortest.. and put the pile down with the tallest ones on the top. The whole idea here is we are starting the walls from the center and working towards each end. It is a lot easier to glue in a bow shape rather than little ‘s’ curves over the 4″ span from cell to cell.
Take that top piece.. the longest one.. remove the plastic films and line it up with the center mark. It should be fairly easy to line up bottom and side with the markings you made on the protective film. Check for fit. You are wanting to get a water tight seal so you don’t want anything way out of square or any bumps that show a lot of daylight between pieces because that kind of space will be difficult to fill with the glue. I know it seems like you could just go over the joint with a heavier duty glue [we do have it for such a reason].. but as this comes together it becomes a real pain to work in the 4″ cells. Rotate the wall untill the best fit is established. When you get a good fit take your glue and glue along the bottom edge and add a tack to the top. A heavy application at the top front will cause the glue to run down the plexi.. often across where you will be viewing. So, just get a dab to hold it in place and save the heavier glueing for when you can turn the condo on its side. Then sit there and wait until it sets up.. a few minutes or so. I did not use clamps and don’t feel they are really needed for this part. But, it does take time.
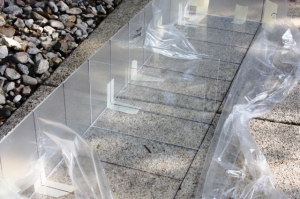 Then, take the next wall piece and line it up with a mark on one side or the other from the center. Check for fit and glue bottom and tack top side like the other piece. Take the next wall piece and this time install it on the other side of the center piece. Check for fit then glue. Continue adding walls alternating from side to side until done. The shortest pieces are going to be closer to the sides and the longer walls will be in the center. By now you can see having the back of the condo off has made it easy to work with these inside pieces. We will continue to build from front to back and will add the back of the condo last.
Now go back and glue both sides of the walls to the bottom of the condo. You are wanting to get a good solid bead so no water can creep through. Depending on when you started this you can let this set up over night or untill later in the day. Carefully flip the condo onto the front and apply glue to both sides of the walls again. Allow time to set up before moving on to the back wall.
July 18, 2010
Posted by DayByDayAlone |
Betta Housing, Fish Room | Betta, Betta Barracks, Betta Housing, Fish Room |
2 Comments

Betta Barracks
I didn’t take pictures of taping the frame together so hopefully I can explain it.
You are going to want to assemble this somewhere other than the ground.. a table or saw horse with a board on top is going to make moving around much easier than crawling around on your knees like I did this time.
Take the piece that is the bottom of the condo and remove the plastic film from the side you did not make the marks on. Place it with the marked plastic side up on several beanie containers [used to house bettas]. If you don’t have them you will need several containers/boxes the same size that can support the condo while you tape it together. They will need to be over 6″ tall or, if you are making a different size condo, taller than your condo is high. Then remove the plastic that is not marked from the front piece of the condo. Place it along the side of the bottom with the marked side out. You should see those marks on the plastic film lining up with the ones on that bottom piece. The front, back and sides of the condo sit on top of the base when complete. So, align the edges so the base/bottom edge is flush with the front of plexi pieces and use masking tape to secure it in several places along the edge. What you are doing is assembling the condo upside down on the supports.
Do the same for the side pieces.. removing the unmarked plastic and placing along the edges of the bottom and securing in place with the tape. The tape will allow you to make changes in placement until you can get everything all lined up. I did this alone without help so it can be done.. but a helping hand will make it easier. Finish up with the back of the condo.. again, removing the plastic from what will be the inside of the condo and leaving the outside protected.
What we need to do next is glue the outside to make the condo strong enough to handle and flip so we can glue the inside. HOWEVER.. we are NOT going to glue that back piece of the condo into place until the entire inside is DONE. Right now it is in place for support.. but we will be removing it shortly. Use care when glueing the side pieces NOT to glue to that back end.
A few words about the glue. When you apply the glue it works into the seam of the two pieces by capillary action. It is so cool.. you can see it creeping into the joint and often it is ahead of where you are actually applying it. Soo.. be mindful of that if you don’t want something glued. With the bottle applicator you never fill it over half full. To keep from dripping the glue when you are moving it to where you want to apply it, squeeze the bottle so much of the air is gone. Then, gradually releasing the vacuum you created, tip the bottle upside down and move into position. Then you just gently squeeze and run the needled along the joint.
Now.. back to the condo. What we are going to do is tack some places to get the plexi holding together so we can do some more glueing. I applied glue to the seam along the front piece corners and in several places that were not covered with masking tape. I did several places along the side pieces as well.. remembering to keep the glue well away from that back piece. I let everything sit for about 30 minutes then pulled the pieces of masking tape down to where I could glue under them. You want to allow the glue to set before you put the tape back in place.. so I kinda moved from front to side and kept moving until I had most of the front and sides glued. Everything sat like this until the next morning where I built the walls.
July 18, 2010
Posted by DayByDayAlone |
Betta Housing, Fish Room | Betta Barracks, Betta Housing, Fish Room |
4 Comments
 Since I still am staying with family until I get employment and a place to live, most of my stuff is packed up and in a storage unit in town. I spent some time trying to find the glue and plexi cutter I have but to no avail. I kept all the fish stuff together and even marked the boxes.. but they must be the ones buried in the back of storage. So.. I had to order more glue and the applicator bottles. While waiting for them to arrive I got busy gettings ready to assemble.
This is the bottom of the condo. I took a tape measure and marked off 9″ with a Sharpie on the film covering the plexi. You probably do not want to do this on the plexi itself. Keeping the plexi covered will also protect it from scratches until you are done. I then marked the cell divisions every 4″. You can now see the “floor plan” of the condo. These marks will be your guides when you are glueing. That line at the 9″ mark will not be exact.. there will be the offset of the front pice of plexi of the condo that is about 1/8″ wide. It isn’t rocket science and that back piece just needs to be close.
 I then layed the piece of plexi that was to be the front of the condo on top the bottom and traced the lines so they exactly lined up. Do the same thing to the piece that is the back wall of the cells.. NOT the back of the condo itself. Remember this back wall is 1/4″ shorter than the front so you need to allow 1/8″ on each side before you mark your lines. When you are glueing the condo together these lines will help keep you relatively square and lined up. I also labeled the pieces so I did not pick up the wrong one by accident.
 The two end pieces also got labeled and marked 8 7/8″ from the edge. I also marked where I wanted to have the drain. Now is the time to drill the hole for the drain. I did not do it till later and I assembled all but that side because I had to locate the bit I had bought to cut the plexi. Ideally the hole is cut and the drain installed and glued into place before you start to assemble the condo.
To get a good result when cutting the hole, tape both sides of the plexi with masking tape and cut slowly. It helps if someone can add water while you are cutting. I poured water on the area before starting and stopped and added more as I cut. Not ideal but it worked for me.
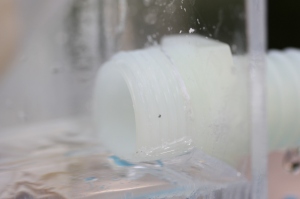
I used a bit to drill a 1″ hole in the plexi. I then took my Dremmel and took off a hair more plexi until I could thread the fitting for the 1″ hose through the hole. I did this at the end of the project.. it is better to do it unassembled so you can use aquarium sealant to get a good seal both the inside and outside of the fitting. It is also good to do this before assembling in case you break or crack the plexi.. better to get another piece than have to try to remove something glued into place on the finished product.
I also took a metal file and filed off any burrs or rough spots from having the plexi cut. You don’t want to do a lot of filing.. but it helps if there are not odd bumps that will keep you from getting a good bond when you glue. Next step is assembling the frame.
July 18, 2010
Posted by DayByDayAlone |
Betta Housing, Fish Room | Betta, Betta Barracks, Betta Housing, Fish Room |
2 Comments
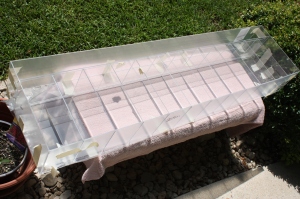
Betta Barracks
After using my previous creation for many months, design flaws became apparent. The water flowing left to right from cell to cell was not as good a flow as planned. Water added to the end produced a nice flow for the first 4 cells.. then after that there did not seem to be much. If you added something like meth blue and watched it move through the system.. you found it made it most of the way but not to the end. The flow pushed water but it did not seem to carry the new water evenly to the end. So, the thought that the first cells were getting better water changes than the last cells made me go back to the drawing board.
The new plan calls for the same idea of water flowing under a divider and over another divider.. but this time it was overflowing to the back of the cell into a gutter instead of the neighbors cell. Each fish will have its own supply of fresh water. Water will be dripped from above into each cell and the overflow will go out the back. There is very little access of another fishes water coming into a cell, hopefully reducing the spread of any disease. I also wanted bigger cells for the fish so the entire condo is 4’x1′. The individual cells are 4″ x 9″.. giving the fish 3 more inches of room and water than before. The other 3″ is the gutter that runs along the back with a 1″ outlet for water to drain into the filter system. Each condo will hold about 10 gallons and with four and the 30 gallon sump the entire system will hold 70 gallons of water. I will be able to shut off the system and remove 25 gallons from the sump whenever I need to.
Since I have some free time I headed to Lowe’s and got my plexi bought and cut to make the first prototype. I will eventually have 4 of these on a shelf unit.. all draining into a 30 gallon tank where the water will be filtered and pumped back up to the condos. From experience, they will need tweaking so I got enough to make one. I used just one sheet [under $50] and they cut it for me. First 3 cuts were free.. then I think it was .50/cut. I knew from before I wanted to use long pieces to reduce all the glueing so I have:
a bottom [4′ x 12″],
front and back [4′ x 6″] ,
2 sides [11.75″ x 6″]
back of condo [ 3′ 11 3/4″ x 5 3/4″]
overflow [ 3′ 11 3/4″ x 5″]
11 side walls to the condos [9″ x 6″]
Since I took lots of pictures I am going to break the construction into phases so the blog posts don’t get too long. Next post is getting things ready.
July 18, 2010
Posted by DayByDayAlone |
Betta Housing, Fish Room | Betta Barracks, Betta Housing |
5 Comments
The move took its toll on the fish and my live foods. The white worms were moved in the vehicle on the floor of the back seat. The concern was the heat that would build up in the moving van would kill the worms. Even though they were kept fairly cool, we lost both of the white worm cultures. I have dug around hoping to find a few I might be able to bring back but it seems they all have perished. A better suggestion for moving them would be to put them in a styrofoam cooler with a few ice packs under a layer of newspaper or towels to keep them cooler. They were already declining because of the house temps.. and the move pretty much finished them off. After I am settled I will start then up again.
The micro worms seem to have made the move ok. They are not producing as many worms and have declined, but I will refresh the cultures and add some yeast and they should come back fine. I have gotten to scraping the top of the micro worm culture off to the side, removing the old oatmeal I use for them and adding fresh. I grind my oatmeal in a coffee grinder to a fine powder and mix with enough water to make a firm paste. When I add the paste to the worms I stir it all together, add some yeast and set aside. Within a few hours I have a fresh batch of micros crawling up the side. The oatmeal I removed I used to feed to the white worms.. gonna have to just discard it till I get some more white worms.
The vinegar eels also seem to have made the trip ok. I had then in a plastic juice bottle and I just tightened the lid for the move. When we stopped for the night I opened the top for a few minutes then put it back on and tightened. Was not sure how they would do with out air, but a good number seem to still be alive. I will add some sugar and set them aside to regrow.
Live cultures are easy enough to obtain so are not necessarily a priority to move. But, I did learn that it can be done if planned.
July 4, 2010
Posted by DayByDayAlone |
Info You Can Use, Live Foods | Live Foods, Micro Worms, Vinegar Eels, White Worms |
Leave a comment
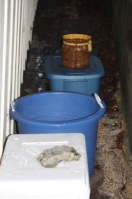 Well, the fish are finally settled and we did have some casualties. We lost all the bagged fish in the metallic spawn, Spawn 13. The fish that were individually bagged all made it, but the larger juvies we bagged together did not. I was concerned that they would have to be kept separated upon arrival if I separated them for the move.. and I did not have the room or time to do that. The big problem with the larger fish in the bigger bags was a death of one fish quickly contaminated the water and killed the rest. We found that with the snails as well.. one died and then they all did. The smaller spawns, the ones from Rocket and Pearl made the move with some losses. The larger fish all seem to have survived.. the smaller ones have perished. Was it the move or the 4 days without food I don’t know. But there was definitely a better survival rate for the larger fish.
Right now the younger spawns are in 2 ten gallon tanks about half filled with water. Hard to see them in the photo as they are past the blue tub. In the blue round tub is a little older spawn and in the white styrofoam and the blue rectangular tub are the fish in beanies. I am staying with my mother as I look for a place to live and can not bring the fish into the house so they are housed between the garage and a concrete retaining wall. In Texas the temperatures are in the 90’s so the fish will do fine outside. The big concern is the wild life here. The area has feral cats and the deer can be very aggressive getting water. We did not want fish containers broke or knocked over as wild things satisfy their thirst. So, this arrangement protects the fish and the overhang and wall keep most of the rain out. I have one of my 32 gallon trash cans with water aging and am doing water changes about once a week. EEEEK.. I know.. but, with interviews and looking for a place to live.. again, it is the best we can do. My concern is to bring my lines to adulthood, choose the best to breed when I am settled and think about Spring shows. We may have a few to show in the Fall, but not like we did last year. One thing for sure.. we will be breeding the hardiest of the spawn.
 Along the concrete retaining wall there are large patches of ‘hair’. This photo shows a very small one. The larger ones can be 18″ wide and 3-4′ in length. The hairs blow in the wind and I had never seen anything like it. Well, when this smaller one was closer to the fish I decided to investigate.
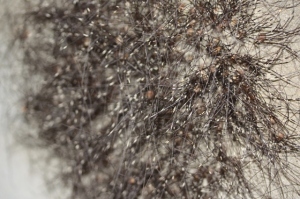 So I got real close and stuck my nose up real close. Imagine my surprise when they started to move and scatter. To say I fell over was an understatement. As they scattered it became clear what they were.. Daddy Long Legs. Bunches and bunches of them.. all piled up together. It was the wildest thing. I have never seen so many together and never clumped up like this. They have always been separate.
 Another thing these spiders do is bounce up and down all together. It is something to see a patch almost 4′ wide bouncing up and down and vibrating together. ANother thing I have discovered back there is chiggers. I now have red, itchy bumps all over and am searching for ways to deal with the discomfort. So far, a bottle of Ambesol has taken the edge off the itch and hopefully will allow the bites to heal. I hope I get a place to live soon.
July 3, 2010
Posted by DayByDayAlone |
Betta Housing, Fish Room, Not Bettas, Other Critters | Fish Room |
Leave a comment
 Well, the fish are finally settled and we did have some casualties. We lost all the bagged fish in the metallic spawn, Spawn 13. The fish that were individually bagged all made it, but the larger juvies we bagged together did not. I was concerned that they would have to be kept separated upon arrival if I separated them for the move.. and I did not have the room or time to do that. The big problem with the larger fish in the bigger bags was a death of one fish quickly contaminated the water and killed the rest. We found that with the snails as well.. one died and then they all did. The smaller spawns, the ones from Rocket and Pearl made the move with some losses. The larger fish all seem to have survived.. the smaller ones have perished. Was it the move or the 4 days without food I don’t know. But there was definitely a better survival rate for the larger fish.
 Along the concrete retaining wall there are large patches of ‘hair’. This photo shows a very small one. The larger ones can be 18″ wide and 3-4′ in length. The hairs blow in the wind and I had never seen anything like it. Well, when this smaller one was closer to the fish I decided to investigate.
 So I got real close and stuck my nose up real close. Imagine my surprise when they started to move and scatter. To say I fell over was an understatement. As they scattered it became clear what they were.. Daddy Long Legs. Bunches and bunches of them.. all piled up together. It was the wildest thing. I have never seen so many together and never clumped up like this. They have always been separate.
 Another thing these spiders do is bounce up and down all together. It is something to see a patch almost 4′ wide bouncing up and down and vibrating together. ANother thing I have discovered back there is chiggers. I now have red, itchy bumps all over and am searching for ways to deal with the discomfort. So far, a bottle of Ambesol has taken the edge off the itch and hopefully will allow the bites to heal. I hope I get a place to live soon.


